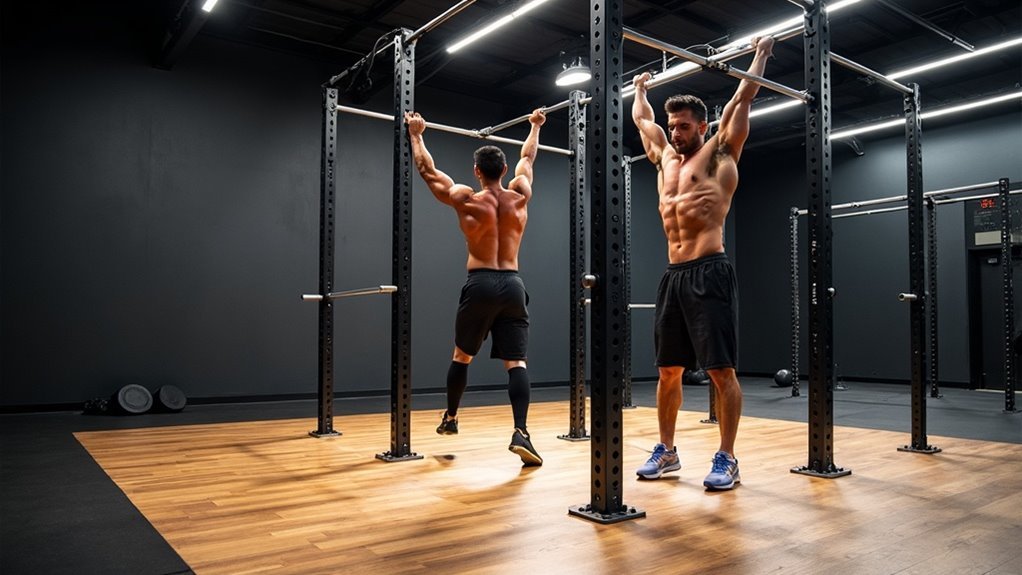
To enhance kipping clearance in your home gym, position the rack crossmember at a minimum height of 84 inches and extend it 18 inches beyond the rack. This height ensures a full range of motion, reducing the risk of collisions during dynamic pull-up movements. Additionally, take into account your personal height and arm length for optimal placement. Ensuring proper alignment and secure attachment is essential for safety during your workouts. By considering these factors, you can maximize your workout efficiency and performance, helping you stay healthy and fit from the comfort of your home.
Key Takeaways
- Position the crossmember at least 84 inches high to ensure optimal kipping clearance and allow for full arm extension during pull-ups, suitable for both men and women.
- Install the pull-up bar between 7 to 8 feet high to facilitate safe dynamic movements and provide ample swinging space for all users.
- Ensure the crossmember extends at least 18 inches outside the rack to enhance kipping clearance and minimize the risk of collision during exercises.
- Adjust the height according to individual user height and arm length, accommodating various body types to prevent contact during kipping movements.
- Regularly inspect the installation for stability and secure attachment, ensuring a safe workout environment for everyone exercising at home.
Importance of Crossmember Height
The height of the crossmember is crucial for achieving optimal kipping clearance during your home workouts. A lower crossmember can restrict your range of motion, increasing the likelihood of hitting the bar.
For the best results, aim for a height of around 84 inches or higher, tailored to your individual height and arm length. This ideal positioning allows for full arm extension during kipping pull-ups, enhancing your overall workout experience.
Furthermore, crossmembers specifically designed for kipping movements extend further from the rack, offering ample space for dynamic exercises. Adjusting the position of the crossmember can accommodate various workout techniques, making your sessions safer and more effective.
Recommended Height for Kipping Clearance
To ensure optimal kipping clearance for your home gym, position the pull-up bar between 7 to 8 feet high to allow for dynamic movement.
Additionally, extending the bar 18 inches outside the rack can provide extra swinging space, enhancing your workout experience.
Be sure to adjust the crossmember height based on your personal height and technique to avoid any contact during kipping exercises.
This setup will help you stay healthy and fit while exercising at home.
Optimal Height Selection
When selecting the ideal height for crossmember placement in your home gym, it’s essential to ensure a kipping clearance of at least 7 to 8 feet above the ground. This height allows for full body movement during kipping pull-ups and minimizes the risk of hitting the rack.
To enhance your performance and safety, consider these factors:
- Adjust the height based on your personal stature to optimize movement efficiency for both men and women.
- Ensure the crossmember is securely attached and stable to support your workouts.
- Test your kipping clearance with practice reps before finalizing a specific height.
Bar Positioning Techniques
Positioning the pull-up bar at the correct height is crucial for maximizing kipping clearance and ensuring safe execution of movements in your home gym.
Ideally, your kipping bar should be set at least 7 to 8 feet above the ground, allowing for a full range of motion during kipping pull-ups. If your kipping bar extends 18 inches outside the rack, make sure the crossmember placement provides ample overhead space.
Adjustability in the crossmember height is important to accommodate different heights and techniques of both men and women.
Always consider your home gym’s ceiling height, ensuring it’s at least 9 feet to maintain safety during dynamic kipping movements.
This setup will help you achieve your fitness goals while exercising comfortably at home.
Factors Influencing Crossmember Placement
Understanding the factors influencing crossmember placement is crucial for optimizing kipping movements in your home workouts. Here are some key considerations to keep in mind:
- Height: Ensure the crossmember is positioned at least 7-8 feet off the ground to accommodate taller athletes and prevent any accidental collisions during kipping exercises.
- Pull-up Bar Height: If your kipping bar extends 18 inches outside the rack, this will require you to adjust the crossmember placement to a higher position for optimal safety and performance.
- Width of the Crossmember: Wider crossmembers can restrict lateral space, making it necessary to place them higher to ensure sufficient clearance during dynamic movements.
Proper alignment and secure attachment of crossmembers are vital for safety during your kipping workouts. This will help prevent accidents and guarantee that you can perform efficiently and confidently in your home gym setting.
Safety Considerations for Pull-Up Movements
When performing kipping movements in your home gym, prioritizing safety is essential to avoid injuries. Proper crossmember placement is crucial; a lower crossmember can limit your range of motion and increase the risk of head contact.
Ensure there’s at least 18 inches of clearance above your pull-up bar for safe execution, particularly in spaces with lower ceilings. Keep in mind, your height matters—taller individuals will need additional clearance for safe movement.
It’s vital to securely attach crossmembers to prevent accidents during dynamic exercises. Regularly inspect your rack and crossmember for stability and wear to guarantee a safe workout environment when engaging in kipping pull-ups.
Adjusting Crossmember for Different Users
When adjusting the crossmember for different users in your home gym, take into account your height and preferred grip style to ensure optimal kipping clearance.
A crossmember set above 7 feet generally accommodates a variety of body types and workout techniques.
Don’t hesitate to experiment with different heights to find the configuration that enhances both your performance and safety during your home workouts.
Whether you’re a man or a woman, finding the right setup is key to achieving your fitness goals.
User Height Considerations
Adjusting the crossmember height is crucial for accommodating users of varying heights, particularly to enhance kipping clearance during workouts at home.
Here are key user height considerations for both men and women:
- For users over 6 feet tall, position the crossmember above 80 inches to maximize kipping range and ensure an effective workout.
- Confirm that the crossmember is at least 12 inches above the tallest user’s reach to prevent interference during kipping exercises, allowing for a safe and productive training session.
- Utilize an adjustable crossmember to cater to multiple users, enabling personalized setups based on individual height and preferences for a more comfortable exercise experience.
Grip Style Preferences
To enhance your home workout experience, it’s crucial to consider how grip style affects crossmember placement in your gym setup.
Whether you prefer a wide or narrow grip, adjusting the crossmembers accordingly can significantly improve your kipping clearance and overall exercise performance. Ideally, the crossmember should extend at least 18 inches beyond the rack’s uprights to allow for unrestricted movement during dynamic workouts.
Customizable crossmembers enable you to personalize your equipment, fostering better performance and comfort during your routines.
Additionally, securely mounting pull-up bars at the appropriate height accommodates various grip styles, reduces safety hazards, and boosts the efficiency and effectiveness of your workouts—making it ideal for everyone looking to stay fit and healthy at home.
Crossmember Adjustment Techniques
While proper crossmember adjustment is essential for maximizing kipping clearance, it also plays a vital role in accommodating the diverse needs of home gym users.
To effectively implement crossmember adjustment techniques, consider the following:
- Height Variation: Adjust the crossmember height to cater to individuals of varying heights, ensuring an optimal range of motion for everyone in your home gym.
- Secure Installation: Ensure the crossmember is tightly fastened to prevent any instability during high-intensity kipping movements, providing a safe workout environment.
- Multiple Grip Options: Utilize 16″ crossmembers to offer various grip choices while maintaining sufficient clearance for kipping exercises.
Regularly review and adjust based on user feedback to enhance both functionality and safety in your home gym, helping you achieve your fitness goals effectively.
Enhancing Performance With Proper Placement
Achieving optimal performance in kipping movements relies on the thoughtful placement of the crossmember in your Ares 2.0 rack. By positioning the crossmember higher, you can maximize kipping clearance, which minimizes the risk of colliding with the bar during dynamic movements.
Additionally, utilizing a kipping pull-up bar that extends 18 inches beyond the rack enhances your freedom of movement. It’s crucial to securely attach the crossmember at a height that suits your unique technique and body type, promoting smoother kipping motions.
Remember to consider the dimensions of your workout space; higher placements may require extra ceiling height to safely perform kipping movements. This ensures that your home gym setup supports your fitness goals while keeping you safe and comfortable.
Common Mistakes in Crossmember Installation
Installing the crossmember incorrectly can significantly affect your kipping performance and safety during home workouts. To ensure optimal installation and a safe environment, avoid these common mistakes:
Improper crossmember installation can hinder kipping performance and pose safety risks during home workouts.
- Incorrect Height: Positioning the crossmember too low can obstruct your kipping movements, limiting your range of motion and effectiveness during exercises.
- Neglecting Measurements: Overlooking necessary clearance measurements can lead to safety hazards and insufficient space for a variety of exercises, impacting your workout routine.
- Insecure Attachment: Failing to securely fasten the crossmember can compromise stability while kipping, increasing the risk of injury and diminishing your overall performance.
Always refer to manufacturer guidelines for proper placement to maintain functionality and avoid voiding warranties.
Tips for Securing Crossmembers Effectively
Securing crossmembers effectively is essential for enhancing your kipping performance and ensuring safety during your home workouts. Here are some key tips for proper installation:
| Step | Action | Notes |
|---|---|---|
| Height | Install at least 18 inches high | Ensures adequate kipping clearance |
| Alignment | Use a level for straight installation | Prevents wobbling during movements |
| Weight Limits | Check limits before installation | Avoids failure during dynamic movements |
| Manufacturer Guidelines | Follow torque specs for bolts | Guarantees a secure attachment |
| Regular Inspections | Inspect for wear or loosening | Maintains safety and performance |