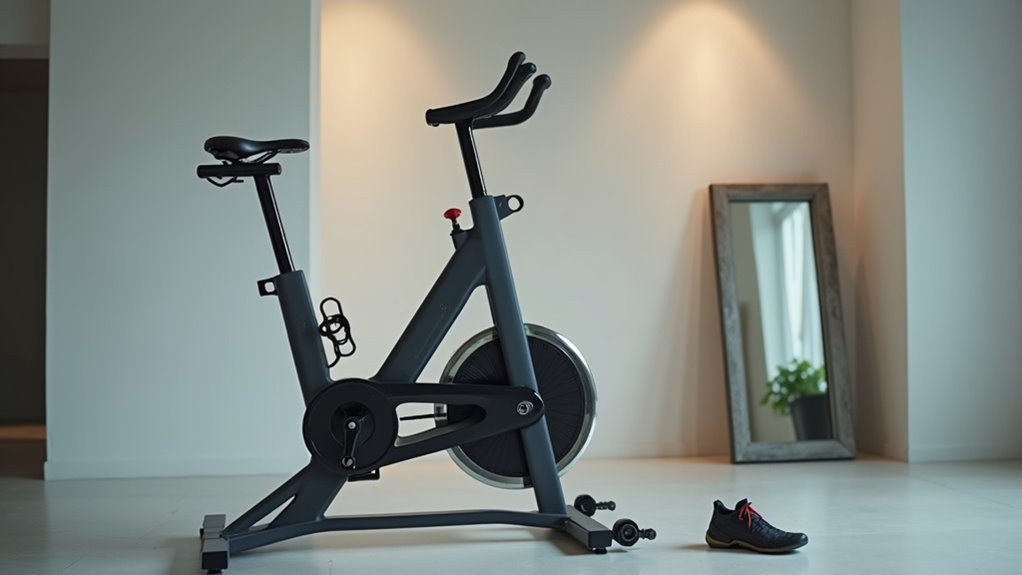
To set your bike fit for indoor cycling at home, begin by adjusting the seat height to align with your hipbone when standing next to the bike. Next, fine-tune the distance so that your knee is positioned directly over the pedal when it is at the 9 o’clock and 3 o’clock positions. After that, set your handlebars slightly below the saddle to promote a comfortable and relaxed posture. Remember to maintain a straight spine and engage your core while riding to maximize your workout. Stay tuned for more tips on optimizing your home gym experience and enhancing your overall fitness journey!
Key Takeaways
- Adjust the saddle height so it aligns with your hipbone when standing next to the bike, ensuring a slight bend in the knee at the bottom of the pedal stroke for optimal comfort and efficiency.
- Position the saddle distance so your front knee aligns with the pedal at both the 9 o’clock and 3 o’clock positions to prevent joint stress and enhance your cycling experience.
- Set handlebars at or slightly below saddle height to promote a relaxed posture, maintaining a slight bend in your elbows to minimize neck and back strain during your workout.
- Keep a straight spine and engage your core while riding, ensuring your knees track over the middle of your feet for effective power transfer and performance improvement.
- Regularly assess and record your measurements to ensure your bike setup remains optimal, allowing you to track your progress over time and achieve your fitness goals from the comfort of home.
Importance of Proper Bike Setup
When you prioritize proper bike setup for indoor cycling in your home gym, you’re not just enhancing your comfort; you’re also paving the way for improved performance and injury prevention.
A precise bike fit is essential, as general guidelines may not cater to everyone’s individual needs. Regularly assess your setup to ensure comfort and maintain proper form. Small adjustments to saddle height and handlebar position can significantly elevate your cycling experience, leading to better muscle engagement.
A precise bike fit is crucial; small adjustments can enhance comfort and boost performance significantly.
A well-fitted bike minimizes the risk of injury and discomfort, allowing you to enjoy your workouts fully. While professional fitting is ideal, even simple tweaks can improve your performance and satisfaction on the bike.
Don’t underestimate the impact of a proper setup in your home fitness journey!
Seat Height
Getting your seat height right is essential for a comfortable workout at home.
Start by adjusting the seat to align with your hipbone when standing next to the exercise bike or equipment.
Then, fine-tune it so that your knee has a slight bend at the 6 o’clock position while pedaling or using the machine.
This attention to hip alignment and knee angle can greatly enhance your performance, making your home fitness routine more effective and enjoyable while helping to prevent discomfort.
Ideal Hipbone Alignment
Achieving the ideal hipbone alignment for your indoor cycling setup is crucial for both comfort and performance, especially when exercising at home.
To set up your bike correctly, adjust your saddle height so that it aligns with your hipbone when standing next to the bike. While pedaling, ensure that your knee is straight at the 6 o’clock position, ideally maintaining a slight bend of 5 to 10 degrees for optimal efficiency.
Additionally, it’s important that your feet can touch the floor when removed from the pedals for safety.
Knee Angle Consideration
To optimize your indoor cycling experience and enhance your home workout routine, it’s essential to pay attention to your knee angle in relation to seat height.
When adjusting your saddle height, ensure your knee is straight at the 6 o’clock position on the pedal, ideally with a subtle bend of 5 to 10 degrees. For efficient movement, your knee angle should flex 25 to 35 degrees at the bottom of the pedal stroke.
Additionally, keep your front knee aligned over the middle of your foot during the 3 o’clock and 9 o’clock positions.
Regularly reassessing these angles not only boosts comfort but also improves your performance while cycling indoors, making your home gym experience more effective for both men and women.
Seat Distance
Ensuring your seat distance is correct is crucial for enhancing your comfort and performance while exercising at home.
Position your saddle so that your front knee aligns with the middle of the pedal at the 9 o’clock and 3 o’clock positions. Adjust your shoe clips to improve knee alignment with your feet during your workouts.
An incorrect seat distance can lead to joint stress and limit muscle engagement, resulting in discomfort or injury. Engage your glutes to maintain proper knee alignment and prevent potential issues.
Regularly assess and adjust your seat distance on your indoor bike or other home gym equipment to maximize comfort and performance, ensuring a more effective workout experience for both men and women.
Handlebar Height
Finding the right handlebar height is essential for your comfort and performance during indoor cycling at home.
Aim for the handlebars to be at or slightly below saddle height, which promotes a relaxed posture with slightly bent elbows—ideal for both men and women.
Regularly check and adjust this setting to ensure you maintain a neutral spine and avoid any strain while you ride, enhancing your overall home workout experience.
Importance of Comfort
When setting up your home gym, the height of your bike’s handlebars is crucial for ensuring comfort during indoor cycling sessions.
A well-adjusted handlebar height allows for a slight bend in your elbows, which helps relax your shoulders and reduces unnecessary strain on your neck and back. This alignment is vital for maintaining a strong core and engaged posture, both of which are essential for optimal power output during your workouts.
To determine the right height, sit on your bike and extend your arms parallel to the floor; adjust the handlebars until your wrists comfortably rest on them.
Remember to regularly evaluate your handlebar height, as shifts in your fitness level or cycling style may necessitate adjustments to maintain your comfort while exercising at home.
Adjusting for Proper Position
How can you ensure your handlebar height enhances your indoor cycling experience?
- Aim for a slight bend in your elbows to promote comfort.
- Keep your arms parallel to the ground for optimal support.
- Avoid handlebars that are positioned too low or too high, as this can lead to discomfort.
- Maintain a neutral or slightly upward angle for an effective posture.
- Regularly reassess your handlebar height to achieve the ideal fit for your body.
Adjusting your handlebar height is crucial for an effective home cycling workout.
It helps maintain a relaxed shoulder position, reducing the risk of strain during your sessions.
A proper handlebar height, aligned with your saddle height, supports better core engagement and overall comfort.
Make those micro-adjustments to tailor your setup perfectly and enjoy every pedal stroke in your home gym!
Body Positioning
Achieving the right body positioning during indoor cycling is essential for maximizing your performance and minimizing the risk of injury, whether you’re a man or a woman. Maintain a relatively straight spine and engage your core while riding to enhance your workout. Ensure your knees track over the middle of your feet to optimize power transfer and improve efficiency. Keep your head in a neutral position to reduce neck strain, and adjust your screens to avoid excessive neck flexion. Shift your weight appropriately when moving between sitting and standing to prevent saddle pressure and enhance comfort during your ride.
| Aspect | Tips |
|---|---|
| Spine Alignment | Keep your spine straight and core engaged |
| Knee Tracking | Ensure knees track over your feet |
| Neck Position | Maintain a neutral head position |
| Weight Shifting | Shift weight when changing positions |
Investing in the right home gym equipment and focusing on proper body positioning can significantly enhance your indoor cycling experience and help you achieve your fitness goals.
Test Run for Bike Setup
After you’ve made the necessary adjustments to your bike setup, it’s essential to conduct a test run to ensure everything feels comfortable and efficient for your home workouts.
Conduct a test run after adjusting your bike to ensure comfort and efficiency for your home workouts.
Ride for 10-15 minutes, focusing on your comfort and form.
- Ensure your saddle height allows for a slight bend in your knees at the bottom of the pedal stroke to promote proper biomechanics.
- Be mindful of any discomfort in the saddle, knees, or lower back, as these can affect your workout experience.
- Check that you can see your shoes during the pedal stroke, which indicates proper positioning.
- Adjust the saddle forward or backward as needed to achieve optimal comfort and performance.
- Record your measurements for future reference after making adjustments, helping you maintain the perfect setup for your home gym.
Following these steps will enhance your indoor cycling experience and support your fitness journey!
Protect Your Floor From Damage and Wear
Protecting your floor from damage and wear is crucial when establishing your indoor cycling area. Indoor rides can produce a lot of sweat, which may harm your flooring. Opt for durable surfaces like tile or hardwood for enhanced moisture resistance. Using workout mats can safeguard your flooring while also minimizing noise. Make it a habit to clean the floor regularly to avoid moisture-related problems, and ensure proper ventilation with fans to control heat buildup.
| Solution | Benefits | Tips |
|---|---|---|
| Hard Floor Surfaces | Resilient to moisture and wear | Perfect choice for stationary bikes |
| Workout Mats | Shields against sweat damage | Place under your bike |
| Ventilation | Helps reduce heat and moisture buildup | Strategically position fans |
| Regular Cleaning | Prevents long-term damage to floors | Wipe down after each workout |
Protect Your Bike
To keep your home gym equipment in top shape, regular maintenance is essential.
By taking simple steps, you can guarantee its longevity and performance:
- Regularly wipe down your equipment after each workout to prevent sweat corrosion.
- Use a towel on surfaces to absorb sweat during exercise.
- Monitor wear and tear on components and replace them as needed.
- Lubricate moving parts frequently to maintain optimal performance.
- Consider using protective covers for equipment when not in use to keep them in pristine condition.